art with ross
  • Home
  • Sculpture
  • Jewelry
  • Advanced Sculpture
  • Sculpture for Animation
  • Art Terminology
    • Art Term - Line
    • Art Term - Shape
    • Art Term - Form
    • Art Term - Color
    • Art Term - Value
    • Art Term - Texture
    • Art Term - Space
    • Art Term - Balance
    • Art Term - Contrast
    • Art Term - Dominance
    • Art Term - Pattern
    • Art Term - Movement
    • Art Term - Rhythm
    • Art Term - Variety
    • Art Term - Unity
    • Art Term - Style
    • Art Term - Perspective
    • Art Term - Vantage Point
    • Art Term - Graphic Design
    • Art Term - Hand Lettering
    • Art Term - Drawing Styles
    • Art Term - Shading
    • Art Term - Ceramics
    • Art Term - Painting
  • GHS
    • Field Trips
    • Intro
    • Motion
    • Printmaking
    • AP
    • Gallery
    • Other Art Classes
    • Distance Learning
    • AP 2019
    • Enrichment

ETCHING

Students will create a project with an etched design. Students will etch a design into metal and then shape and form it into a functional piece of jewelry.

This unit has three parts: RESEARCH & DESIGN - students will find inspiration from other sources and then design their project; PROJECT - students will refine their design decisions and make the final etching project; DOCUMENTING - students will photograph, reflect, and share their finished work.

ETCHING OVERVIEW

Picture
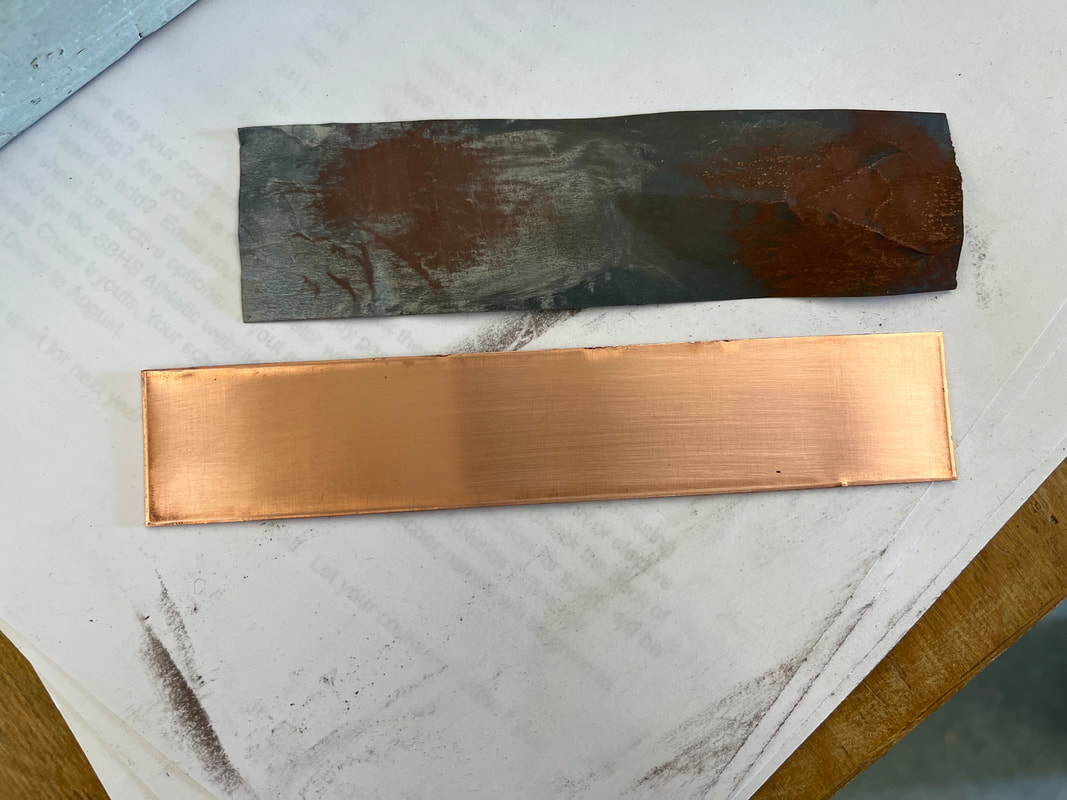
SAND THE METAL (COPPER OR BRASS) WITH 1000 OR HIGHER SANDPAPER & CLEAN
Picture
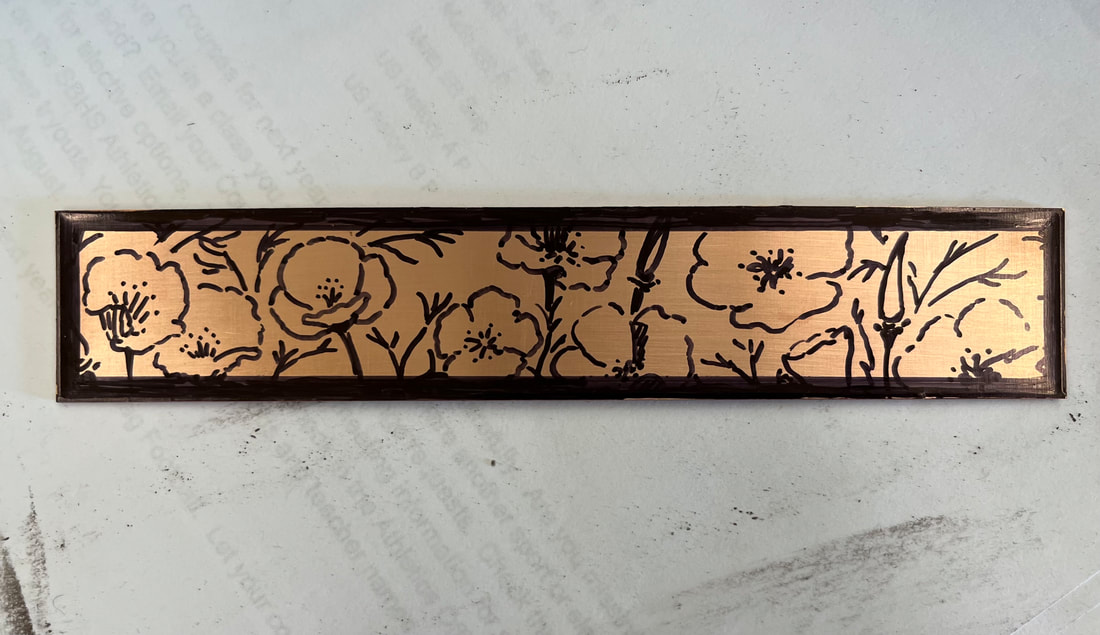
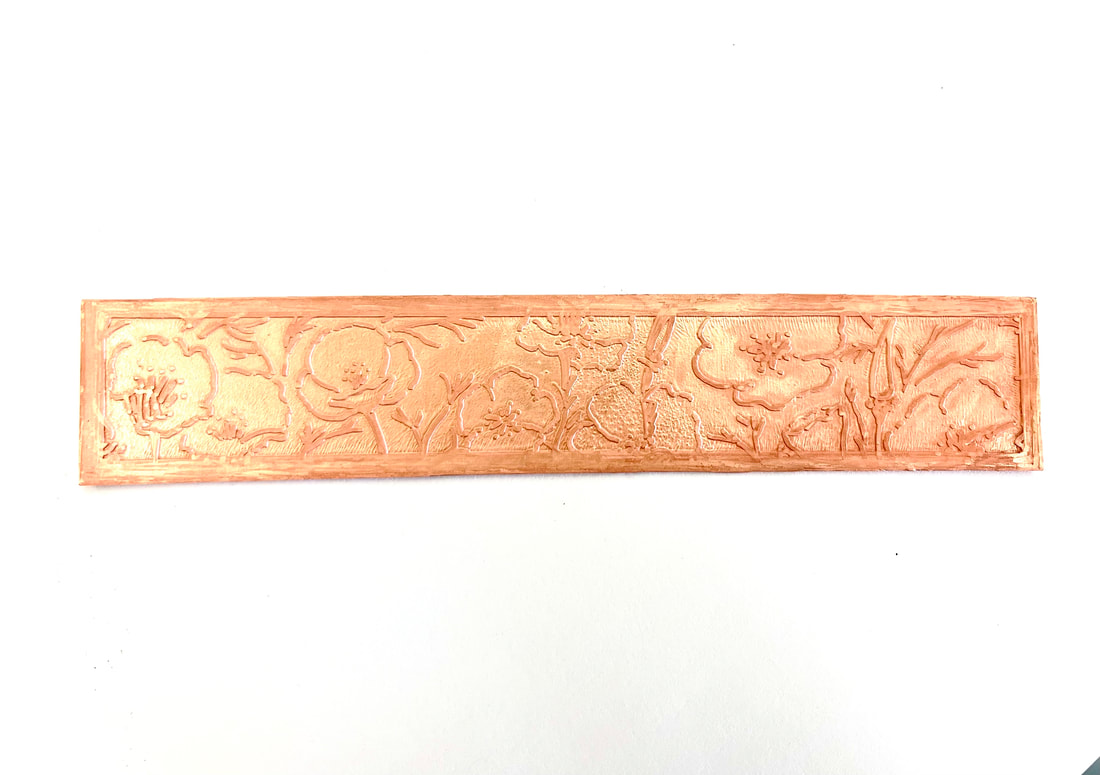
DRAW OR TRANSFER YOUR DESIGN ONTO THE METAL (SHARPIE, HARD GROUND OR TONER)
Picture
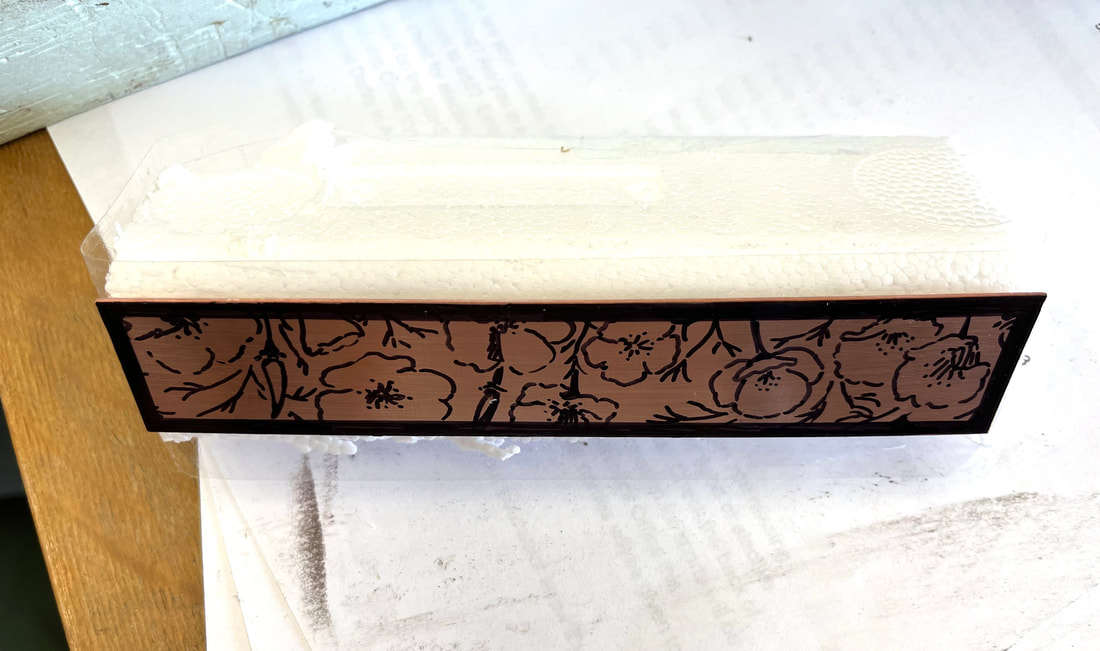
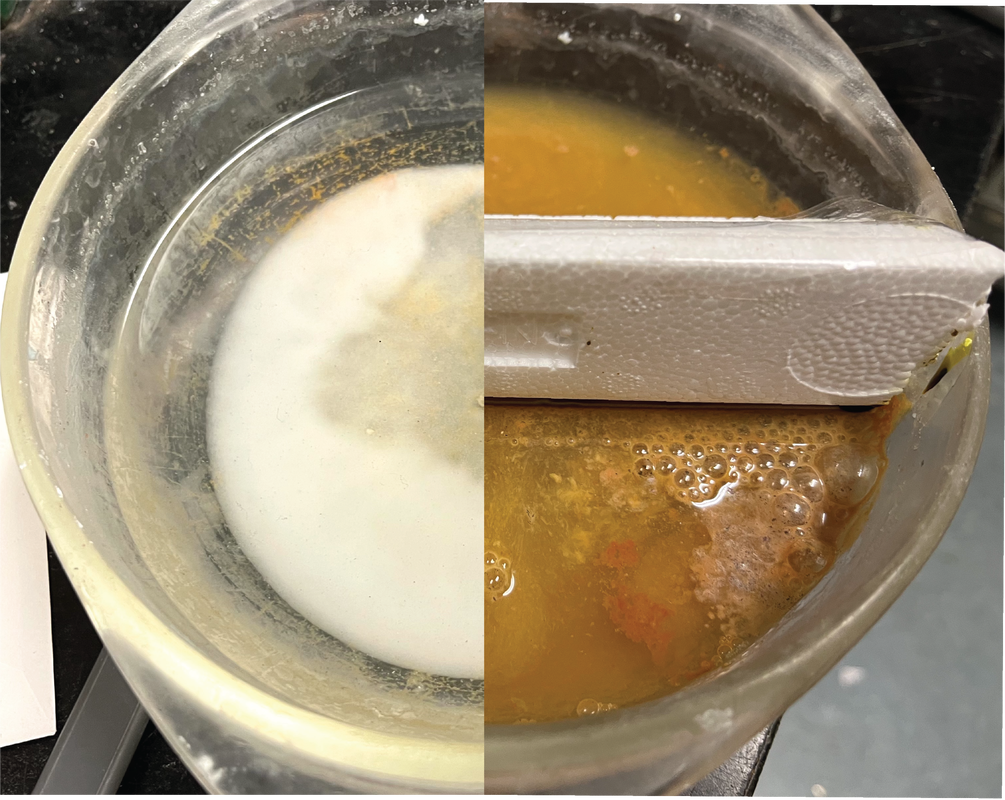
USE CLEAR TAPE TO ATTACH YOUR METAL TO STYROFOAM SO THAT IT FLOATS UPSIDE DOWN IN THE ACID BATH
Picture
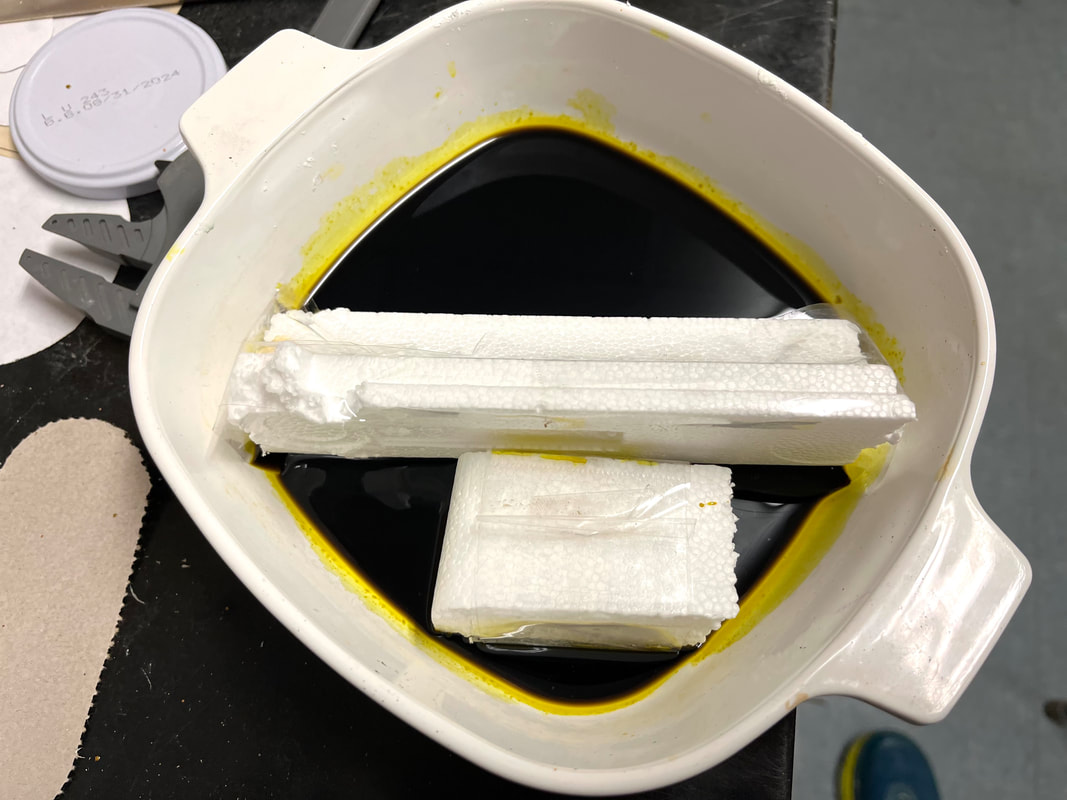
PUT THE METAL SIDE DOWN INTO THE ACID BATH AND LEAVE IT FOR 45 MINS FOR A LIGHT ETCH OR 2 HOURS FOR A HEAVY ETCH
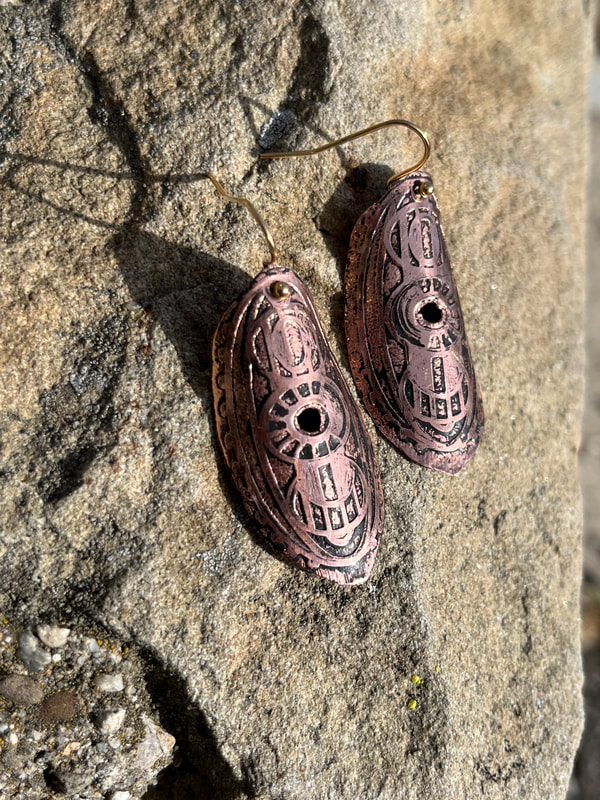
Picture
HEAT THE METAL TO REMOVE SHARPIE & THEN PUT IT IN THE PICKLE TO REMOVE ANY FIRE SCALE - OR - SAND WITH 2000 GRIT SANDPAPER
Picture
BUFF, POLISH, & FORM THE METAL


TECHNICAL SKILLS VIDEOS

ACID ETCH
TONER TRANSFER WITH HEAT
TONER TRANSFER WITH ACETONE
SHARPIE RESIST
Applying Hard Ground
Picture

PROJECT OVERVIEW

  • PLAN OUT HOW YOU WANT TO USE YOUR ETCHED METAL (jewelry applications: ring, pendant, bolo tie, bracelet, earrings, etc.)
  • CUT YOUR METAL (use copper or brass for mordant or ferric chloride etching)
  • SAND & CLEAN ONE SIDE (use 1000 or higher grit sandpaper, clean with a polishing cloth, water, ammonia, or alcohol)
  • APPLY THE IMAGE (you can use a sharpie to draw your image, you can apply hard ground to seal your metal and then scratch off your design using an etching tool or awl,  or you can transfer toner onto the metal using heat or acetone)
  • ACID FLOAT (use clear tape to attach your metal image side out to a piece of foam)
  • ACID BATH (put the metal side down so that it floats in the acid - leave for 45 mins for a light etch or 2+ hours for a heavy etch)
  • HEAT & PICKLE  - OR - SANDING (you can remove the sharpie or toner by heating the metal with a torch and then pickling to remove fire scale; or - you can sand off the very top layer with 2000 sandpaper)
  • USE YOUR ETCHED METAL IN A PROJECT (buff, polish, form, and do any other aspects needed to make your project functional)

ADVANCED IDEAS

  • MORE THAN ONE METAL TYPE
  • PROJECTS WITH HINGES, BEZELS, SPINNER RINGS, AND OTHER MORE COMPLEX FORMS THAT COULD HAVE ETCHED IMAGERY

Composition Concepts

  • Art Styles
  • Form & Function

Tools & Supplies

  • Sandpaper (1000, 1500, 2000, 5000)
  • Sharpie or Brayer and Etching Stylus or Digital image printed in toner

Technical Skills

  • Etching with resist in acid
  • Etching with resist using electricity and salt bath
​

RESEARCH & DESIGN

CHOOSE A SUBJECT OF YOUR ETCHING & FIND 4+ PHOTOS
Picture
RESEARCH ART STYLES & CHOOSE A FEW YOU LIKE
RESEARCH ART STYLES HERE
ALSO HERE
LOOK FOR IDEAS WITH YOU OBJECT AND YOUR ART STYLES
Identify three features of the art style you like best
RESEARCH
  • You will need to select a visual concept for your etched design
  • Your visual concept will be rendered in a specific art style
  • You will need to research art styles to decide which art style you want to use
VISUAL CONCEPT
  • Your visual concept can be an object you'd like to draw or any other visual phenomena
  • Your object will likely be more successful the more recognizable, specific, and dynamic it is
  • To choose a dynamic object, it should have good negative space and a recognizable form
  • TURN IN PHOTOS OF YOUR VISUAL CONCEPT
ART STYLES
  • You'll be drawing your object or visual element in a specific art style
  • Look at all the art styles from art history and choose one that works for you
  • You might want to consider three before narrowing down to your final choice
  • Identify what happens in those compositions to make that art style specific
  • TURN IN PHOTOS OF YOUR ART STYLE
DRAW
  • Draw your visual concept in your chosen art style
USE YOUR REFERENCE PHOTOS TO GUIDE YOUR DESIGN
Picture
Picture

Etching Types & Techniques

Acid Etch on Copper or Brass using Hard Ground Resist

You can use Copper or Brass to etch in acid. The etching mordant contains muriatic acid. The ferric chloride is another acid that etches copper.

The copper will etch deeper for the same amount of time as the brass, since brass has some zinc and zinc is not affected by these acids.

Hard ground resists allow you to make fine lines, like a thin line drawing.
Picture
Picture
Picture
Picture
Picture

Acid Etch on Copper or Brass using Sharpie Resist

You can acid etch on copper or brass using a sharpie resist.

Sharpie resists require you draw with a sharpie in the areas you don't want etched.

It is a good idea to have less than 50% of your surface area etched, and minimize the size of the areas where etching will occur.
​
Picture
Picture
Picture
Picture

More Difficult

Toner Transfer Resist

You can print out your design (mirror image) using a toner printer. You can print onto peel-n-press paper designed for this purpose. You can also use regular paper and use acetone to lift the toner in combination with the iron.

Transfer the toner onto the metal using heat (iron) and/or acetone.

There are many ways this can go wrong.
Your metal must be perfectly smooth and totally clean (no oil residue from finger prints etc.)
The metal has to be the perfect temperature for the toner to adhere to the metal.

Picture
Picture
Picture
Picture

Nickel: Possible, But Not Recommended

Salt Water Electro Etch on Nickel 

Etching into nickel doesn't work with the same acids you can use on copper or brass.

You can hook up your metal to electricity and bathe it in salt water to etch the metal.

The resist has to be well-adhered. A vinyl stencil can be used in place of hard ground. Sharpie doesn't work to resist the electric salt bath.

There are more ways this can go wrong, but if your resist holds up, your etch will work.
Picture
Picture
Picture
Picture
Picture
Using the toner transfer method, this Electro Etch bath lasted for 3.5 hours before the metal was sufficiently etched. 

Preparing Your Metal for Etching

Cut and Sand

  • Cut your metal into the shape you need for your project function
  • Sand your metal fully - from 100 all the way through 2000
  • This is the last time your metal gets sanded
Picture
Picture

Set Up for Etching

Foam Float

  • Get a piece of foam that fits your metal
  • Wrap it with clear tape so the sticky side is facing out, then a handle with the sticky side facing in.
  • Stick your metal to the tape
  • Float the metal in the acid bath so the metal is facing down into the acid
  • Wiggle it in the acid to remove any air bubbles
  • Set a time and make sure to take your metal out of the acid bath
Picture
Picture

Buffing & Polishing

Buff & Polish

  • Before any forming, buff and polish your piece on the front and back
  • Then, form your piece according to its function (bracelet mandrel, earring hooks, chain for pendant, etc.)

Documenting & Reflecting

Photos

Take two photos of your finished etching project.
  • ONE PHOTO with a solid colored background and professional lighting
  • ONE PHOTO of your etching project in use

Email

Email photos of your work to an important adult in your life. Be sure to include a visual description of the work you made using 3+ art terms.
Picture

Reflection

Be sure to fill out your written reflection prior to presenting your work to the class.
Picture
Powered by Create your own unique website with customizable templates.